BoothStudio súgó

Nyomtatási beállítások és 2x6 fotócsíkok

Ezen az oldalon találod a BoothStudio nyomtatási oldalának legfontosabb beállításait: fő és másodlagos nyomtató, igazítás, automatikus nyomtatás, vendég nyomtatás gomb, limitek és a klasszikus 2x6 fotócsík 4x6 / 10x15 cm papírra.

Frissítve: 2026. július 5. Ajánlott: DP-DS620, DNP, Epson, Canon fotónyomtatókhoz

Fő és másodlagos nyomtató

A fő nyomtatót használja a BoothStudio alapból. Ha nincs külön kiválasztva nyomtató, a Windows alapértelmezett nyomtatója dolgozik.

  • Fő nyomtató: ez kezeli a normál esemény-nyomtatást.
  • Másodlagos nyomtató: akkor hasznos, ha két nyomtatót használsz terheléselosztáshoz vagy külön sablonhoz.
  • Nyomtató beállítása: megnyitja a Windows nyomtató-tulajdonságait, ahol papírméretet, vágást és minőséget tudsz állítani.

2x6 fotócsík nyomtatása

A 2x6 fotócsík általában úgy készül, hogy két csík kerül egy 4x6 / 10x15 cm fotópapírra. A BoothStudio a sablon alapján elkészíti a lapot, a fizikai vágást pedig a nyomtató beállításában kell bekapcsolni, ha a nyomtató támogatja.

  1. Hozz létre vagy válassz egy 2x6 álló fotócsík sablont a Fotó elrendezés oldalon.
  2. A Nyomtatási beállítások oldalon kapcsold be a 2 csík / lap opciót.
  3. A Nyomtató beállítása gombbal nyisd meg a Windows nyomtatóbeállítást.
  4. Állítsd a papírt 4x6 / 10x15 cm méretre, majd kapcsold be a nyomtató vágó / 2 inch cut opcióját, ha elérhető.
  5. Nyomtass Tesztoldalt, és finomítsd a méretezést vagy az eltolást, amíg középen van a csík.
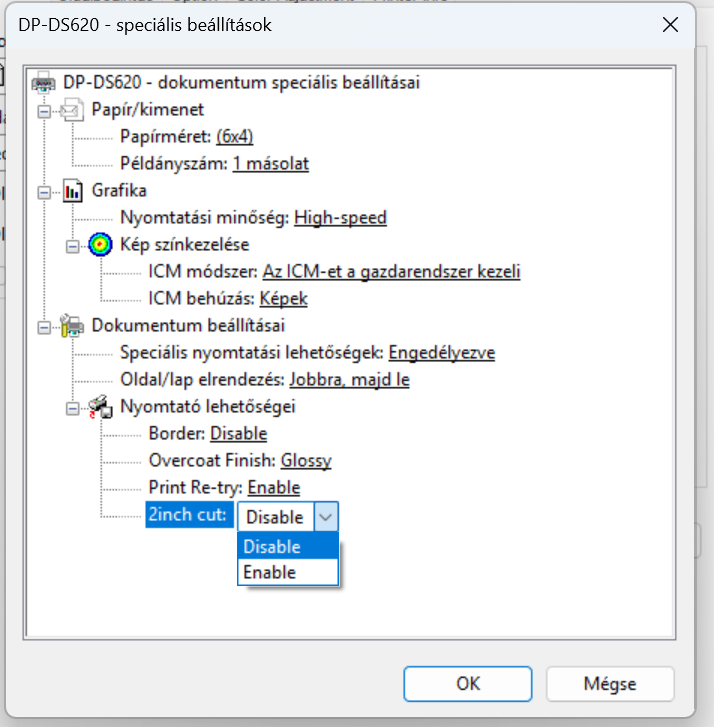
DP-DS620 nyomtatóbeállítás, 2inch cut engedélyezése
Példa: DP-DS620 driverben a Papírméret 6x4 és a 2inch cut legyen Enable állásban, ha kettévágott 2x6 csíkot szeretnél.

Fontos: a BoothStudio nem helyettesíti a nyomtató saját vágóbeállítását. Ha a papír nem vágódik ketté, azt a Windows nyomtatóbeállításban vagy a gyártó nyomtatópaneljén kell engedélyezni.

Kapcsolók és vendég nyomtatás

Nyomtatás engedélyezve

Ez a fő kapcsoló. Ha ki van kapcsolva, a BoothStudio nem indít nyomtatást.

Automatikus nyomtatás

Az elkészült session automatikusan nyomtatódik, operátori kattintás nélkül.

Nyomtatás gomb

A vendég megosztó képernyőjén megjelenik a Nyomtatás gomb, ahol példányszám is kérhető.

Nyomtatás mindkettőre

Két nyomtatónál felváltva használja a fő és másodlagos nyomtatót.

Nyomat igazítása

Ha a nyomat kicsit elcsúszik vagy a papír szélén levágódik, használd az igazítási vezérlőket.

  • Méretezés: nagyítja vagy kicsinyíti a nyomatot.
  • Vízszintes eltolás: balra vagy jobbra mozgatja a képet.
  • Függőleges eltolás: fel vagy le mozgatja a képet.
  • Tesztoldal: gyors ellenőrzés valódi papíron, esemény indítása nélkül.

Gyakori hibák

A mentett nyomtató nem látszik

Ellenőrizd, hogy a nyomtató be van kapcsolva, a Windows látja, és a BoothStudio nyomtatási oldalon nyomj Frissítést. Ha átnevezted a nyomtatót, válaszd ki újra a listából.

Nem két csík kerül egy lapra

Ellenőrizd, hogy 2x6 sablon aktív-e, a 2 csík / lap be van-e kapcsolva, és a papír mérete 4x6 / 10x15 cm.

Nem vágja ketté a nyomatot

A vágást a nyomtató saját beállítása kezeli. Nyisd meg a Nyomtató beállítása ablakot, és kapcsold be a cutter / 2 inch cut opciót, ha a nyomtató támogatja.

Elcsúszik vagy levágódik a nyomat

Nyomtass tesztoldalt, majd finomítsd a méretezést, a vízszintes és a függőleges eltolást.

BoothStudio help

Print setup and 2x6 photo strips

This guide explains the main BoothStudio print settings: main and secondary printers, alignment, automatic printing, guest print button, print limits, and classic 2x6 photo strips on 4x6 / 10x15 cm paper.

Updated: July 5, 2026 Recommended for DP-DS620, DNP, Epson, Canon photo printers

Main and secondary printer

The main printer is used by default. If no printer is selected, BoothStudio prints to the Windows default printer.

  • Main printer: handles normal event printing.
  • Secondary printer: useful when you run two printers for load balancing or a separate template.
  • Configure printer: opens the Windows printer preferences, where you set paper size, cutting and quality.

Printing 2x6 photo strips

A 2x6 strip setup usually prints two strips on one 4x6 / 10x15 cm sheet. BoothStudio prepares the sheet from your template; the physical cut must be enabled in your printer settings if your printer supports it.

  1. Create or choose a vertical 2x6 photo strip template on the Photo Layout page.
  2. On the Print Setup page, enable 2 strips / sheet.
  3. Use Configure printer to open the Windows printer preferences.
  4. Set paper size to 4x6 / 10x15 cm, then enable the cutter / 2 inch cut option if available.
  5. Print a test page and adjust scale or offsets until the strip is centered.
DP-DS620 printer preferences with 2inch cut enabled
Example: in the DP-DS620 driver, use Paper Size 6x4 and set 2inch cut to Enable when you want the 4x6 sheet cut into two 2x6 strips.

Important: BoothStudio does not replace the printer's own cutter setting. If the sheet is not cut in half, enable cutting in Windows printer preferences or the manufacturer's printer panel.

Switches and guest printing

Print enabled

The master print switch. When it is off, BoothStudio will not print.

Print automatically

Completed sessions print automatically without operator action.

Print button

Shows a Print button on the guest sharing screen, with an optional copy selector.

Print to both printers

Alternates between the main and secondary printer when two printers are available.

Print alignment

If the output is slightly shifted or cropped near the paper edge, use the alignment controls.

  • Scale: enlarges or reduces the print.
  • Horizontal offset: moves the image left or right.
  • Vertical offset: moves the image up or down.
  • Test page: checks alignment on real paper without launching an event.

Common issues

The saved printer is not visible

Make sure the printer is powered on and visible in Windows, then press Refresh on the BoothStudio Print Setup page. If you renamed the printer, select it again from the list.

Two strips are not placed on one sheet

Check that a 2x6 template is active, 2 strips / sheet is enabled, and paper size is set to 4x6 / 10x15 cm.

The sheet is not cut in half

Cutting is handled by the printer. Open Configure printer and enable the cutter / 2 inch cut option if your printer supports it.

The output is shifted or cropped

Print a test page, then adjust scale, horizontal offset and vertical offset.